
The upload is rejected
Read the format or size message for this Chat upload.
Choose a permitted file or reduce its size, then try again. Do not rely on a limit from the Resources upload guide.
Use Upload Files in Chat to add material for your request. Wait for the file to finish uploading or processing, then ask a clear question about it. For speaking a message instead of typing, use the separate voice-input guide.
Use a file you are allowed to share and that is relevant to the task. Remove unnecessary student details. Check the file formats and size limit shown in the upload control; Chat and Resources do not necessarily accept the same files or sizes.
Open the paperclip control near the Chat composer, then choose Upload Files from its menu to select a file on your device. For a file already in TopSchool, use the menu’s Add Resources option instead. Check the name in the attachment area so you know you selected the correct version.
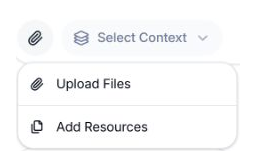
Choose Upload Files for a file on your device, or Add Resources for material already in TopSchool.
Read any upload or processing message before sending. A file still being processed may not yet be ready for the request. If an error appears, note what it says and correct the file or remove the failed attachment before trying again.
For example: “Use this lesson outline to suggest three questions that check the main learning objective.” Name the part of the file you want to use and the output you need. Do not assume PLAI knows whether you want a summary, adaptation or critique.
When the attachment is ready and your request is complete, select Send. Compare important facts, quotations and page references with the original. If the file was difficult to read, provide a clearer source rather than relying on an uncertain answer.
Before sending, use the removal control on the attachment you do not want to include, then check the remaining names. Removing a pending attachment is not a promise to erase material already sent in an earlier message.
Your message includes the intended attachment and a clear request, and you know to check the answer against the source.
Read the format or size message for this Chat upload.
Choose a permitted file or reduce its size, then try again. Do not rely on a limit from the Resources upload guide.
Check that the attachment was ready and included with the message.
Refer to the relevant section explicitly, and check the source yourself before using the response.
Tell the team what you were trying to do and what happened.
Contact support or send feedback